How to grill corn on the cob is a skill that turns a simple summer vegetable into a smoky, flavorful side dish that pairs perfectly with burgers, steaks, barbecue, and grilled chicken.
The grill adds a light char while bringing out corn’s natural sweetness. With the right preparation and cooking method, you can achieve tender kernels and rich flavor every time.
Whether you prefer direct heat or cooking in the husk, understanding the proper technique makes a noticeable difference in taste and texture.
1. Choosing Fresh Corn and Simple Prep Before Grilling
The quality of the corn has a major impact on the final result. Fresh corn should have bright green husks, moist silk, and plump kernels. Avoid ears with dry husks or brown, brittle silk.
Before grilling, peel back a small section of the husk to inspect the kernels. They should be tightly packed and uniform in color.
Selecting the Best Sweet Corn
Look for corn that feels firm and heavy for its size. The husk should fit snugly around the ear without large gaps.
Freshly harvested corn tends to have higher sugar content. As time passes, those sugars gradually convert into starch, which can reduce sweetness.
Basic Preparation Options
There are two common ways to prepare corn before grilling:
- Remove the husks and grill directly over the heat.
- Leave the husks on and grill the corn inside its natural wrapper.
Both methods work well. However, each creates a slightly different flavor and texture.
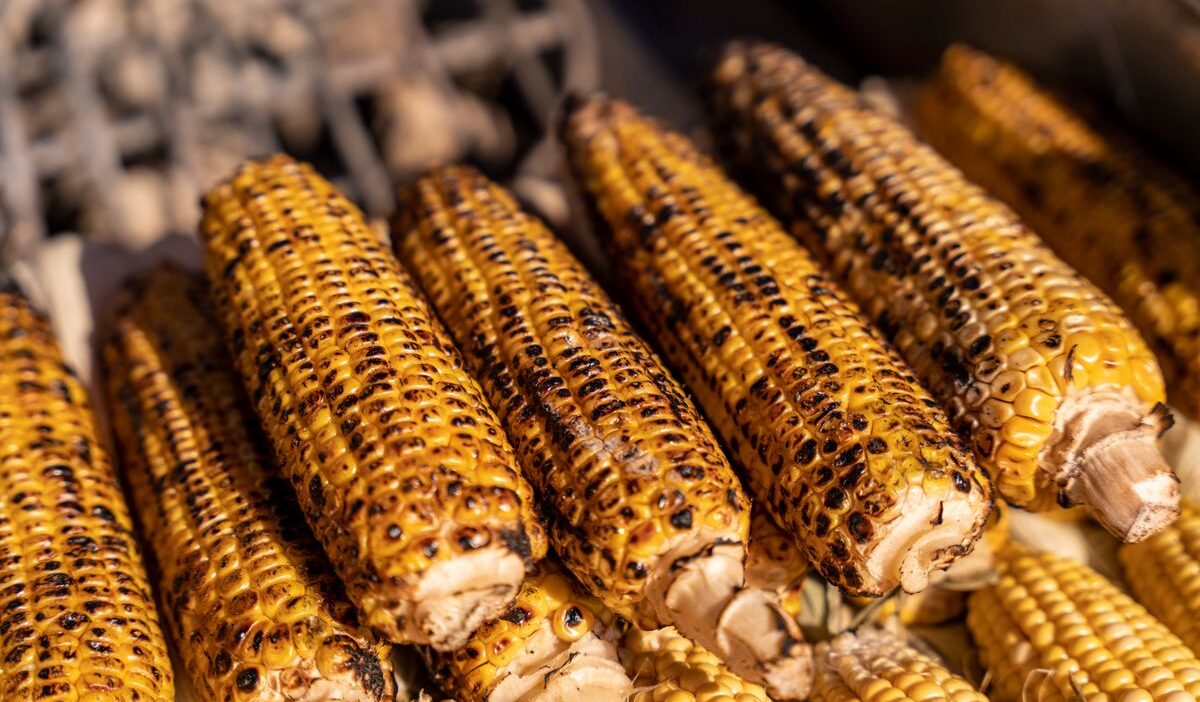
2. Grilling Corn on the Cob Using Direct Heat
Direct grilling produces the most noticeable char and smoky flavor. It’s also an easy method for beginners learning to cook corn on the grill.
Here’s how to grill corn on the cob using direct heat in 6 simple steps:
Step 1: Prepare the Corn
Start by giving each ear of corn a quick inspection. Remove any loose or damaged outer leaves, but keep the husks largely intact since they will act as a protective layer during grilling.
If long strands of silk are sticking out from the top, trim them slightly to prevent excessive burning. The goal is to keep the corn wrapped naturally so it can steam gently while it cooks.
Step 2: Preheat the Grill
Many home cooks like to soak the corn in cold water for about 15–30 minutes before grilling. This extra moisture can help slow down the charring of the husks and create a bit more steam inside while the corn cooks.
That said, soaking is not required. Fresh corn already contains plenty of natural moisture, so you can still achieve tender, juicy results even if you’re short on time and decide to skip this step.
Step 3: Grill the Corn
While the corn is resting, preheat your grill to medium heat, roughly 350°F to 400°F. A properly heated grill helps the corn cook evenly without scorching the husks too quickly. Giving the grill a few minutes to reach temperature will make the entire process smoother and more consistent.
Step 4: Rotate for Even Cooking
Once the grill is ready, place the ears directly on the grates with the husks still attached. Leave a little space between each ear so the heat can circulate evenly around them. At this stage, the husks will begin to dry and lightly char, while the kernels inside slowly steam and soften.
Step 5: Check for Doneness
Turn the corn every few minutes throughout the cooking process. Rotating helps all sides cook evenly and prevents one section of the husk from burning too much.
Don’t worry if the outer leaves become dark brown or even black in some spots; that’s completely normal. The husks are doing their job by shielding the kernels from direct heat and locking in moisture.
Step 6: Add Flavor
After about 15–20 minutes, carefully remove the corn from the grill using tongs. Let it cool for a minute or two before peeling back the husks. The kernels should appear plump, bright yellow, and juicy.
If they are tender when pierced with a fork, the corn is ready to serve. Remove any remaining silk, add your favorite toppings if desired, and enjoy while it’s still warm.
Quick Reference: Cooking Times
- Time over medium-high heat: 10–15 minutes
- Rotate: every 2–3 minutes
- Check: tender kernels with light browning
Note: Cooking times may vary slightly depending on the size of the corn and your grill’s heat.
>>> Read more: Best Meat to Smoke: Complete Guide for Beginners and BBQ Enthusiasts
3. How to Grill Corn on the Cob in the Husk for Natural Sweetness
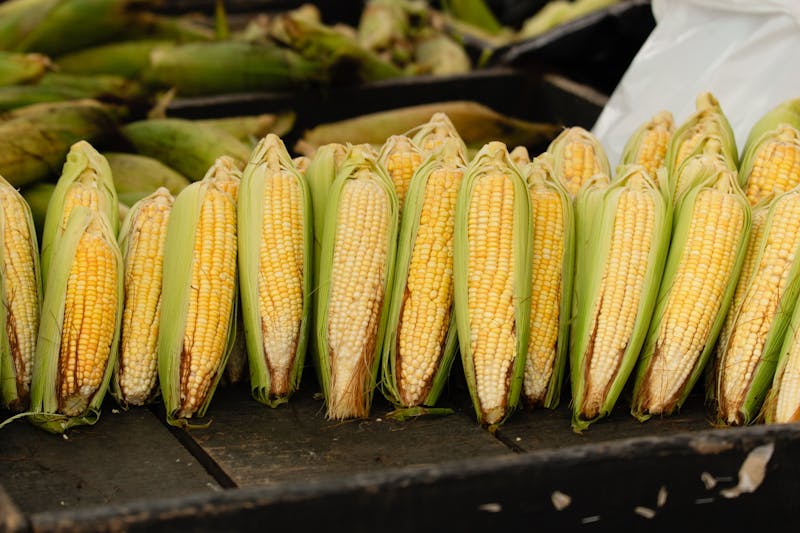
Many people prefer how to grill corn on the cob in the husk because the husk acts as a natural steamer. This method helps preserve moisture while producing exceptionally tender kernels.
Here’s the step-by-step husk-on grilling method for this most popular vegetable in the United States:
Step 1: Leave the Husks Mostly Intact
The husks are the secret behind this cooking method. Instead of removing them, leave them wrapped around the corn so they can trap moisture while grilling. Pull away any loose or damaged outer leaves and trim excess silk that hangs from the tip. The husk will become a natural protective layer that helps keep the kernels tender.
Step 2: Decide Whether to Soak
Some people like to soak their corn before grilling, while others skip it entirely. Soaking the ears in water for 15-30 minutes may help the husks stay moist a little longer over the heat, but it’s not essential.
If you’re using fresh summer corn, there’s usually enough natural moisture inside the ear to produce excellent results without any soaking at all.
Step 3: Heat the Grill
Bring your grill to a steady medium heat, about 350°F to 400°F. Moderate heat works best because it allows the corn to cook through gradually while the husks slowly roast on the outside.
Step 4: Let the Corn Cook in Its Own Steam
Place the ears directly on the grill and close the lid if possible. As the husks warm up, the moisture trapped inside begins to steam the kernels. This gentle cooking process helps preserve the corn’s natural sweetness and keeps it from drying out.
Step 5: Turn Occasionally
Every few minutes, rotate the ears to expose a different side to the heat. The husks will begin to darken and develop charred patches, which is completely normal. While the outside may look heavily roasted, the kernels underneath remain protected and continue cooking evenly.
Step 6: Unwrap and Serve
After about 15–20 minutes, transfer the corn to a plate and allow it to cool briefly. Carefully peel back the husks and remove the silk. The kernels should look plump, glossy, and vibrant in color. At this point, the corn is ready to enjoy as-is or with a little butter, seasoning, or your favorite toppings.
4. Timing Guide for Perfect Results: How Long to Grill Corn on the Cob
One of the most common questions people ask is how long to grill corn on the cob. The good news is that corn is fairly forgiving, and you don’t need to watch the clock obsessively to achieve great results.
While cooking times provide a helpful starting point, the best results come from combining those guidelines with a quick visual check as the corn cooks.
Direct Heat Timing
If you’re grilling corn without the husks, plan on cooking it over medium to medium-high heat (375°F-450°F) for about 10-15 minutes.
Because the kernels are exposed directly to the heat, they’ll cook relatively quickly and develop those delicious golden-brown char marks. Be sure to turn the ears every few minutes so each side cooks evenly, and nothing burns before the corn becomes tender.
| Grill Temperature | Cooking Time |
| 375°F–450°F | 10–15 minutes |
Husk-On Timing
When grilling corn in the husk, the process takes a little longer because the husk acts as a protective layer and natural steamer.
At a grill temperature of 350°F-400°F, most ears will be ready in about 15-20 minutes. Rotating the corn occasionally helps the husks char evenly while allowing the kernels inside to cook gently and retain their moisture.
| Grill Temperature | Cooking Time |
| 350°F–400°F | 15–20 minutes |
Signs Corn Is Done
Although timers are helpful, your eyes are often the best guide.
When corn is fully cooked, the kernels should look plump, tender, and slightly glossy. If you gently press a kernel, it should release a little juice rather than feel firm or dry. You’ll also notice the color becoming more vibrant as the natural sugars warm and soften.
These visual cues can often tell you more than the clock alone.
Factors That Affect Cooking Time
Every grill and every ear of corn is a little different, so don’t be surprised if your cooking time varies slightly.
A few factors that can affect grilling time include:
- The size of the ears, since larger ears generally need more time
- The freshness of the corn, as older corn may take longer to become tender
- Temperature fluctuations on the grill
- Whether you’re cooking with or without the husks
For that reason, it’s best to think of grilling times as a helpful guide rather than a strict rule. A quick check of the kernels near the end of cooking will help ensure perfectly grilled corn every time.
>>> Read more: How Long to Grill Chicken Breast: Perfect Timing for Each Type
5. FAQs
How long does it take to grill corn on the cob with husk on?
Corn grilled in the husk typically takes 15 to 20 minutes over medium heat. Don’t forget to rotate the ears regularly for even cooking.
Should I soak corn before grilling it in the husk?
Soaking is optional. Fresh corn usually contains enough moisture to steam properly inside the husk.
Can I grill corn without removing all the silk?
Yes. Small amounts of silk are not harmful and can be removed easily after cooking. However, removing most silk beforehand improves presentation.
What temperature is best for grilling corn evenly?
Medium to medium-high heat, between 375°F and 450°F, provides the best balance between tenderness and caramelization.
6. Conclusion
How to grill corn on the cob comes down to selecting fresh corn, using the right grilling method, and carefully monitoring cooking time.
Whether you prefer direct heat for smoky char or husk-on grilling for extra sweetness, both techniques produce delicious results.
By understanding how to cook corn on the cob on the grill or in the husk, you can serve tender, flavorful corn that complements any backyard barbecue or family meal.